Saturday, July 21, 2012

Work in Progress: A Dragon's Eyes (proof of concept)

Alright.  So I have this incredibly complicated design for a light-up eye involving three pieces of clear plastic in three different shapes (a rounded "cornea", a flat, etched and painted "iris", and a rounded "retina") and three LEDs in two different colors.  How could this possibly go wrong!

The flesh-tone stuff around the eye is modeling putty.  It stays pliable almost
forever unless its heated.  All it's for here is to prevent the resin from running out.
I knew how all the parts were going to fit together if not how they were going to stay together.  I also hadn't figured out was how I was going to fit it all in the eye socket of the dragon's head.  I thought that I was going to have to cut one of my circular jeweler's resin lenses to fit in the almond-shaped eye-hole and then glue it in place to form the cornea.  I started with what was essential: I made the eye-hole since I couldn't know what shape to cut the lens until I had that.  I carved the existing eye out of my reproduction dragon face with a rotary tool (at this point I'm still working on proof-of-concept, not the actual dragon sculpture).  I put the reproduction back in the original mold when I was done to check my work, and I had a sudden inspiration: I didn't have to re-shape anything to fit in the hole in the face.  I could clamp the original mold on and simply pour clear resin in the void I'd just cut!  As long as the part I was working on remained level and the mold was firmly clamped to the urethane reproduction the jeweler's resin should cure in the same exact shape as the eye I had just removed.  Furthermore I expected that the jeweler's resin would even stick like glue to the urethane saving me from finding some invisible means by which to secure the cornea in the socket.

To make sure there was no spillage I created a wall around the hole with modeling clay.  That would allow me to over-fill the space a little (it's easier to remove excess material than it is to add it).  I clamped the mold and face together with spring clamps, and then I clamped the whole assembly to the table to keep it level over-night.  I took care to mix the resin without incorporating any bubbles, and when I unmolded the piece the following day (re-unmolded?) the eye was exactly the right shape and securely and neatly bonded to the surrounding face.  I repeated the technique I had used previously to polish the cornea (a few drops of resin on the rough surface), and another day later the results were even better than I had hoped!

Right eye right out of the mold.  The black spring clamp in the picture is just there
 to give some contrast to the eye.


This is the right eye polished up.  The iris is simply scratched in the back of the cornea with the tip of a screwdriver.  I wish I had taken a picture
before I'd scratched the iris in.


I arranged with Dean a time to present my proof-of-concept so I could move on to working on the original sculpture.  I suppose it should have been a warning as I was getting ready to take everything out to show him that I had to go to great lengths to pack everything in sealable containers so nothing would get damaged or lost en route.  It took a bit of time to re-wire my demonstration electronics and to sort and stack all the parts I'd built.  The result was a rickety pile that only displayed the illusion I was hoping for if the observer viewed it from directly above.  Dean was non-plussed, and I can't say I disagreed with him.  To be frank I had no idea at that point how I was going to get all those parts to remain together, and the stack was taller than half the width of the dragon's head into which I planned to fit two of them (the eyes are on opposite sides of the head). 

On the positive side: Dean really liked the look of the clear resin cornea I'd poured in my reproduction of the dragon's face.  There were a couple small bubbles in the resin that became more visible when the light was shone through, and the bubbles were causing the light to bounce in an interesting way.  Dean actually liked how they looked, and he pointed out that if the resin was full of bubbles the light being refracted from all of them would diffuse the light shining through and make it visible from all directions. 

Dean gave me the go-ahead to start cutting on the original to at least get that component started.  Not having an iris however would mean the ultraviolet LEDs would have nothing to make them visible (reflect a visible wavelength), so I would have to switch to an LED with a color in the visible spectrum.  I hadn't cancelled my order for the ultra-bright purple LEDs from China, so having an iris painted with fluorescent purple pigment won't technically be essential (assuming they ever arrive).  I did experiment with etching the back of the resin cornea to make it resemble a slit-pupil iris though, and Dean wasn't entirely opposed to the way it looked.

Back at home I repeated the process I'd used to pour the first eye on the other side, but instead of taking my time to mix the resin gently I beat the hell out of it to incorporate as many bubbles as possible.  As I was about to pour the resin I had an idea:  rather than etching a slit-pupil I could cast one.  The resin I had just mixed had a milky appearance from the quantity of bubbles, and the etching I'd used on the clear cornea wouldn't be visible anyway.  I took one of the clear lenses I'd created previously as an experiment and cut it with my band saw into an oblong shape.  This I set into the mold before I poured the new resin.  Without all the bubbles the clear (old) resin was denser than the new, bubbly resin, so gravity held it in place while the resin cured.  After a layer of polish was added the resulting eye actually looked rather nice (if I do say so myself) if a little rough (the mold is starting to show signs of wear). 

The left eye.  The mold has been damaged by constantly putting the reproduction in and out of it (my fault).  Nonetheless, I like the result. 
I'll probably make the pupil narrower in the final version.

I now have the original dragon sculpture in my workshop, so I have work to do.  First I have to create a new mold that's easier to work with and in better shape than the one I currently have.  Next I have to grind out the existing eyes (this could be difficult: the resin of the original sculpture is much thicker in some places than the reproduction with which I've been working).  Then I have to pour new eyes (having a vastly different space in which to work than with my proof-of-concept).  Finally I have to wire the electronic components.

Coming soon: Assembly!

Saturday, July 14, 2012

Work in Progress: A Dragon's Eyes (part 2)

As of Thursday three weeks ago I had a reasonable reproduction of an original dragon sculpture's face and eyes, but I had only a vague idea of what I was going to do to make the glowing eyes themselves.  It was the eyes after all that I was originally consulted to make not the reproduction of the face (that was a fun side-project that I could alter if necessary).  Dean and Adrienne want vibrant, purple eyes visible from the end of their block, and the inspiration for the modification had been a pair of edge-lit, cat's eyes goggles I had made for my wife as a costume piece.

The existing eyes of the dragon sculpture have a pronounced hemispherical curve, and I decided to maintain that shape as much as possible.  Simply carving the eyes out and replacing them with pieces of flat Plexiglas would certainly accomplish the desired effect, but making the eyes look alive will require keeping the corneal curve.  The best possible result I thought would involve making a complex eye out of three differently shaped components lit in different ways.  I came up with the idea of a curved, clear cornea (replacing the existing eye) sitting on top of a flat, etched piece of edge-lit Plexiglas (etched to resemble an iris) backed by a third, curved piece of clear plastic or glass lit directly from behind by a differently colored LED (amber or red as the backing color behind the purple iris) to look like reflection off a retina.

I don't posses the equipment to grind a lens.  What I needed therefore was to find something (either glass or a clear polymer) that already had the desired curve.  That meant I needed to know what the curve of the existing eye is.  I assumed that the curve matched the surface of a sphere.  I took a couple measurements, used some basic geometry, and I estimated that the eyeballs of the dragon would be about 1.5 inches in diameter.  Roughly the size of a ping pong ball.  That's convenient.

As I was wandering aimlessly through a hobby store looking for a clear object with the shape I needed I happened to notice a package of clear epoxy resin on a shelf.  It was packaged in two parts like the polyurethane I'd used to reproduce the dragon's face, and that made me think about the possibility of making a lens with the curve I wanted.  Over the next few days I experimented with differently shaped molds and clear, pourable media (clear epoxy, acrylic cement, jeweler's resin, and even cyanoacrylate glue).  I had the best results using an oogru mold I took of a ping pong ball (again, convenient) with jeweler's resin.  This produced a clear, hemispherical object similar to a lens.

Various lenses and molds in the experimenting phase of my design.
Jeweler's resin is a two-part, viscous resin that takes at least 24 hours to cure.  This extended cure time prevents excessive heat production (which can cause cloudiness and discoloration I discovered with the clear epoxy) and gives any bubbles in the mix time to rise to the surface.  The result is an optically clear plastic (unless you add dyes) with an amazingly durable and scratch resistant surface.  It can be poured over a table or counter (for example) to create a laminate or into a mold (that may or may not contain other items, encasing them in the resin) to make jewelery or other plastic parts.  The surface exposed to air is amazingly clear, but the surface in contact with the mold takes the texture of the mold.  Since neither the ping pong ball nor the oogru out of which I made the mold are perfectly smooth the resulting lens when unmolded had a hazy surface that appeared to have been frosted.  The curve was perfect, but I couldn't see anything through the rough surface.

I spent another day contemplating techniques that I could use to polish the surface of the lens to make it crystal clear.  I was about to begin testing the resin's response to fire-polishing or using solvents to smooth the surface when I remembered that the flat part of the lens (the part that had been exposed to air while the resin cured) was already smooth and clear without polishing.  I wondered what would happen if I layered the resin.  Would there be a distinct difference between layers, or would old and new layers bond seamlessly?
The top lens is right out of the mold. 
The bottom lens is polished by
adding another layer of resin.


I mixed up another batch of resin, dabbed a couple drops of liquid resin on the top of the dome of the lens (as it rested on the flat surface on a table), and smoothed it carefully over the entire frosted surface.  The rest of the batch went into the same mold from which the first lens came just in case I ruined the one I was working on.  I had hoped that the viscosity of the liquid resin would keep enough of it from simply running off the sides that it would leave a sufficiently thick coat, but with a cure time of 24 hours all I could do was wait and see.  Much to my delight it worked almost perfectly!  Some larger imperfections on the surface of the original lens were still visible, but for the most part the new resin had cured to a glass-smooth finish.  I made new molds taking extreme care to eliminate as many imperfections in the mold as possible, and I poured new resin lenses.


The scariest damn drill bit EVER!

As the new lenses cured I set to work making the next layer of the eye: the iris.  I have a drill bit specifically made for cutting perfect circles.  It's the scariest damn thing I've ever seen attached to my drill press.  It looks like parts are going to come flying off at close to sonic speed at any moment.  I take extensive safety measures each time I use it just in case one of the parts of the bit does come flying off.  It cuts neat circles in Plexiglas though, and that's what I use it for.  I cut a pair of one-and-a-half inch disks out of quarter-inch thick acrylic and drilled holes in the edges on opposite sides to accommodate a pair of 5mm LEDs.  Etching and abrading the disks to resemble a slit-pupil iris was an afternoon project since I've done similar work previously (it's just like making the cat's-eyes goggles).  Gluing the LEDs in and wiring them in series with a resistor was accomplished the following afternoon (never power a LED without a resistor in series or you're basically creating a short-circuit). 

The iris disks, front and back.  The front is frosted by abrading with sandpaper, and
 the back is etched with radial lines to give it a three-dimensional appearance.  There
 are holes drilled in the edges top and bottom for the LEDs.
The iris all wired and lit-up.  The UV
 LEDs for some reason are highly visible to the
camera, but not to the naked eye.


The electronic parts stores in town don't have purple LEDs, so I started with ultraviolet LEDs.  Ultraviolet however is invisible to the human eye.  The hints of purple you see when looking at an ultraviolet light are actually a different wavelength entirely "leaking" through.  UV light does have the interesting property of changing its wavelength in response to many surface materials and reflecting back as a very different color (this isn't entirely accurate at the quantum level, but that discussion is a bit too involved for the scope of this project).  Fluorescent colors (a.k.a day-glo or neon) are the most vibrant examples of this effect as can be seen at many nightclubs ("color brightening" fabric detergents and softeners also contain fluorescent compounds).   My idea was to add a surface paint on the back of the acrylic disk that fluoresces purple under a black-light.  This would serve two purposes: first it would convert invisible UV light into a vibrant purple, and second it would block any light coming from behind the iris everywhere except through the pupil (the only part of the disc not painted).  The "retina" I was still planning to make would then be visible only through the slit pupil.

Do you have any idea how difficult it is to find fluorescent purple paint?  For that matter do you have any idea how hard it is to find fluorescent blue paint for mixing with fluorescent red paint (which is easy to find) to make fluorescent purple?  Red, orange, green, and yellow are all readily available.  I searched for a week to find purple.  I was about to give up, and I had even ordered ultra-bright purple LEDs from a supplier in China as a back-up plan.  By luck however I found the only purple pigment (evidently) in existence in the form of a paint intended for use with an airbrush.

With the cornea and iris completed all that was left was the retina (and of course to mount the whole thing).  Compared with the trouble I had been having with the other two components the retina was a breeze.  All I needed was to use one of the spare jeweler's resin lenses with its flat side to the back of the iris component and to shine a red or amber LED from about an inch behind the curved side of the lens.  This creates a watery glow rather than a pinpoint of light.  I used a breadboard to assemble both an amber and a red LED for test purposes.
This is what it looks like completely assembled.  The red LED shining through a convex lens set behind the slit pupil in the iris disk.  I think it looks really amazing, but it's a very complicated arrangement.


Up next: Putting it all together.

Saturday, July 7, 2012

Work in Progress: A Dragon's Eyes (part 1)

The image from the catalogue.
From time to time I get requests.  Bizarre requests in some cases.  Recently a friend of mine contacted me with a project.  An odd project.  He and his wife were planning to upgrade their mailbox.  They had purchased a resin dragon from a mail-order company that specializes in fantasy and sci-fi themed home decor.  Standing about four feet tall on its hind legs the dragon has a hollow, square-shaped void all the way through the longest part of its body (feet to head).  The hole is just large enough to accommodate a 4X4 post (sunk into the ground of course) which acts both as an anchor and as the mount for the mailbox.  The mailbox itself rests on the top of the dragon's head (I think it would be cooler if the box was in the dragon's mouth, but I didn't design the thing).


Dean (my friend) had examined the decoration when it arrived, and he discovered that in addition to the long, hollow core there was also a fairly large void inside the dragon's head that's accessible from inside the 4X4 core.  It's more than adequate he realized to contain some electronics for some kind of practical effect.  Dean is a software developer and brewmaster (it's a long story) not a weird-ass projects developer, so as one of the weirdest people he knows naturally he called me (actually he'd seen another project I'd completed that's similar to what he wanted done here).

The idea he and his wife had and presented to me was to cut out the opaque resin eyes of the dragon with a rotary tool and replace them with super-bright LEDs.  They initially wanted to power the lights from a battery that recharged daily via a solar cell (kind of like those garden stake-lights you can find at almost any hardware or garden store), but the location of the existing mailbox in the shade of a large tree made that difficult.  Instead Dean suggested running a wire from an existing 24 volt power supply (for a koi pond in their front yard).  It sounded like fun, so after a short brainstorming session to discuss possibilities I drove to his house to see the dragon for myself.

The device Dean had seen previously that had inspired him to bring me in on this project was a pair of steampunk goggles I'd made for my wife.  I had hand-sewn the goggles entirely out of leather and used thick Plexiglas lenses.  The lenses I had etched and frosted to resemble a cat's eyes (slit pupils), and I had edge-lit the lenses with a pair of bright, green LEDs (concealed by the leather rim).  The effect is quite vibrant.  Everywhere the lens is etched or frosted the light of the LEDs is refracted out of the acrylic and visible to viewers nearby.  Everywhere the surface is undamaged the light isn't visible, and the surface appears dark.  The deeper scratches of the etching grab more light and are therefore brighter than the shallower scratches of the frosted areas (which I created by abrading the surface with coarse sandpaper).  The goggles actually put out enough light to see by in the dark, but the same amount of light goes in both directions making it impossible to see in the dark if you're wearing them (they're just a costume piece anyway).  It was something along these lines that Dean and Adrienne wanted for their dragon.


The goggles, turned on.  The batteries and wires are concealed inside the eyes.


Since we didn't have an exact plan for what we were going to do we didn't want to start by damaging the original resin sculpture.  I wanted to have a cheap duplicate I could carve up, and that meant making a mold of the original.  I've experimented with mold-making a couple times using latex.  It's a long, painstaking process of painting on layer after layer of liquid latex and letting it dry between layers before the mold is finally thick enough to survive being removed.  A much quicker option is two-part pourable silicone available at our local hobby and craft store.  I've played with that before as well, but pourable silicone mold material is fairly expensive.  A third option I've been wanting to try that has become popular in the maker community in the last year or so for making rubber parts:  Oogru.

Silicone caulk (silicone I) is an inexpensive and commonly available gel.  It's available at any hardware store for sealing windows and doors.  In thin layers it hardens quickly to form a flexible, water-tight seal.  In large quantities, such as squirting a bunch into a cup, only the outside layer hardens forming a "skin" while everything on the inside of the mass remains liquid for a very long time.  The reason for this is that silicone caulk requires moisture from the air in order to harden.  When the outside layer cures it effectively blocks any additional moisture from getting to the inside.  Some very clever individual discovered that if you mix common corn starch (available at any grocery store) with common silicone caulk (in nearly equal parts) moisture from the cornstarch (which is hygroscopic meaning it naturally and constantly absorbs water from the atmosphere) diffuses slowly and evenly into the silicone allowing it to cure throughout all at the same time.  Mixed quickly and in equal parts the caulk remains a workable liquid with the consistency of cold cake frosting for about five minutes. 

Oogru (the silicone caulk/cornstarch mixture) releases acetic acid as it cures producing some pretty potent fumes.  It isn't really harmful (acetic acid is basically vinegar), but it can cause respiratory irritation (use only in well ventilated areas) and possibly skin irritation if it's applied to the skin.  Don't use oogru to make molds of body parts!

I brought all the requisite materials with me and set to work making a mold of the dragon's face and eyes.  I coated the surface of the resin with silicone lubricant so the mold wouldn't stick too tenaciously.  I applied the oogru in two layers: the first layer thinner than the second in an attempt to get as much detail as possible.  After the oogru had completely cured I mixed some plaster and soaked a piece of cloth in it, and I wrapped the plaster-impregnated cloth over the oogru mold to form a mother-mold.  A mother-mold is essential when working with a flexible primary mold.  When the primary mold is removed from the original there is nothing holding the shape of the mold, so reproductions from the mold will never be exactly like the original.  A rigid mother-mold acts as a shell holding the flexible primary mold in its original shape once its removed from the original allowing for more accurate reproductions.

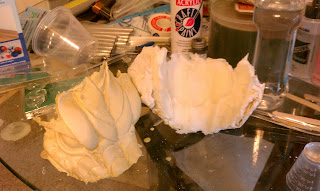
The mold on the right and the reproduction on the left.
Not too bad for my first attempt, if I do say so myself.
The next day I started making reproductions from the mold.  I used two-part, pourable polyurethane resin (available at our hobby and craft store under the brand name Alumalite) in small batches.  I began by brushing the liquid resin into the mold only to discover that it cured VERY quickly and almost incorporated the brush into the finished product.  I switched to even smaller batches (10 ml or less at a time), poured it into the mold, and kept rocking the mold until the resin cured.  (At one point I got distracted and accidentally poured some of the resin onto the leg of my jeans ruining them instantly and gluing my leg hairs to the inside of the pants.  That made for an exciting next few minutes)  This was effective for the recessed features of the mold (the valleys), but it left the projections (the hills) dangerously thin.  As I worked with it I noticed that the resin became increasingly viscous as it cured.  I experimented with the resin until I could consistently get it into the mold at a high viscosity and work it into position over the projections with a popsicle stick just as it became too hard to manipulate.  In this way I was able to make the resin thick enough to survive unmolding.
This is the side of the reproduction up close.  Notice the pronounced curvature of the eye.


 In my next post:  Creating a complex eye.